Powered by Blogger.
Designed by Berita Update - Belajar SEO dan Blog | Copyright of Expert Garden.

Expert Way to Design Front Yard Garden

>> Tuesday, November 6, 2012


Article from : ehow.com

Veggies With a View: Front-Yard Gardens [Designer Plots Offer Beauty and Nutrition]

By Matt Kailey, Contributor 
 
Tired of mowing your front yard? Try harvesting it instead. A front-yard vegetable garden is one way to brighten up the block while adding healthy fare to your dining experience.
"We're seeing a splurge of homeowners using their small front-yard garden space --- formerly used for flowers --- to grow vegetables and other edibles, such as herbs and fruits, because of the increasing desire to eat more locally produced and organic fruits and vegetables," said Craig Jenkins-Sutton, co-owner of Topiarius: Urban Garden & Floral Design in Chicago.
Check your local ordinances first. Front-yard vegetable gardens are not legal everywhere. If you get the green light, bring out your green thumb.

Space Strategies

You don't have to live on a large lot to enjoy an awesome vegetable garden. Even those in cramped quarters may produce crops worth crowing about.
"The key is to maximize the available square footage and to take advantage of all the available sunlight," said Jenkins-Sutton. "Most vegetables will require a minimum of four to six hours of direct light each day. To create the most productive front-yard vegetable garden, installing traditional raised beds on the ground and on front porches is an excellent strategy."
Raised beds are ideal for front yards and porches because they allow for a significantly larger volume of soil than would otherwise be available in a small or confined area, providing ample space for growing a variety of vegetables, including tomatoes, zucchini, potatoes, eggplant, peas and beans, said Jenkins-Sutton.
For even smaller spaces, he suggested "pot-sized" vegetables that have been specially bred for tight squeezes, such as Tom Thumb tomatoes, Gold Nugget carrots and Spacemaster cucumbers.
Another benefit of raised beds is the ease of adding soil amendments to increase fertility and maximize drainage. If space doesn't allow for raised beds, you may use any available container as an alternative, Jenkins-Sutton said. Be sure to add drainage holes, and because plants love soil, use the largest containers possible for the available space. 

Planning Your Plots

For the ideal front-yard garden, the materials you use and the crops you choose are almost equally important. Improper materials can leach potentially harmful chemicals into the soil, Jenkins-Sutton warned.
"Natural stone or untreated and rot-resistant lumber, such as cedar, are good examples of products to choose," he said. "Newer products, such as recycled decking products, are also options."
As for containers, anything that will hold soil will work, he said. When working with containers, make sure the soil stays evenly moist and aerated, but not saturated or compacted, to allow the roots to get the oxygen they require.
Cassy Aoyagi, president of FormLA Landscaping Inc. in Los Angeles, recommended planning your plots around crops that have predictable rotations from season to season.
"For example, beans in the fall, lettuce in winter and eggplant in spring could be one dedicated plot," she said. "Another could be radishes in the fall, broccoli in the winter and tomatoes in the spring. This strategy makes planning and harvesting the easiest."

Invader Alert

Squirrels love vegetable gardens. So do deer, rabbits and even family dogs.
Rabbits and pets may be held at bay with fencing, Jenkins-Sutton said. He suggested burying fencing at least six inches below the surface to keep rabbits from digging under, with openings kept to a minimum to keep them from squeezing through.
"Squirrels and deer are much more difficult garden adversaries," he said. "Short of building a fence fortress around and over the entire garden, use a variety of deterrents, from organic sprays to sensors that trigger sounds/sprinklers when invaders get too close."

Growing Good Neighbors

Front-yard gardens also serve a social function that can make you the hit of the 'hood. For a "neighborly" garden, Aoyagi recommended planting close to the street instead of enclosing the area with greenery, as you might treat a more private area.
"If you really want to engage your neighbors, plant cherry tomatoes or berries that can be picked while passing by," said Wendy Weiner, who teaches clients how to make attractive and functional gardens through her business, the Front Yard Farmer. "Plant something for this specific purpose, and put up a sign that says, 'Yes, please pick the cherry tomatoes.' "
To stimulate passer-by curiosity, put up signs offering the names of specific plants or saying, "Guess what this is?" Another helpful sign, Weiner said, asks dog walkers to keep their pets out of your garden.
To be a good neighbor, keep your front-yard garden fully maintained, attractive and appropriate to the surroundings so it doesn't become a neighborhood eyesore, Weiner said.
"I built raised bed boxes in my front yard for utilitarian reasons," she said. "In doing so, I was able to lay them out in a way that I found attractive and balanced within a classic suburban yard. I like the way the wood has weathered. I wouldn't paint them showy colors."
If you want to add whimsical features to your garden, consider what they might look like when everything has died back. "I prefer to give the plants the leading role in the garden and let a well-tended plant stand on its own," said Weiner. "Too many whirligigs and ornaments can be a distraction."

The Veggies of Your Labor

"The most important thing to remember in front-yard vegetable gardening is to have fun," Jenkins-Sutton said.
"Making a connection to where our food comes from, understanding the difficulties of food production, recognizing the taste and nutritional benefits of growing vegetables and, most of all, the satisfaction of the first vine-ripened tomato are invaluable lessons for people of all ages," he said.

Baca "Expert Way to Design Front Yard Garden" Read more...

Expert Way to Treat New Sod


How to Treat New Sod thumbnail
Article from : ehow.com

How to Treat New Sod


Treat New Sod
Taking a lawn from patchy crabgrass and weeds to a luxurious, green carpet takes an investment of time and money, but it has a great payoff: grass you can roll around on. Soil preparation, choosing the right sod for your climate and light levels and correctly installing it are only the beginning of the process. Following through with care and maintenance of the new sod is the final step to a beautiful, healthy, fully established lawn.

Instructions


  • Immediately after laying sod, really soak it to a depth of 6 inches. This will likely take several hours.
  • Set a watering schedule on a calendar and don't miss a day unless it rains. Place several pails in the sprinkler's path. Turn off the sprinkler when the water in the pails measures 1 inch to avoid "drowning" the sod. Do this every other day for the first three weeks to ensure roots are establishing themselves in the soil underneath.
  • Mow after four to seven days. Maintain grass at a height of 2 inches, but allow it to grow at least 1 inch between mowings.
  • After three weeks, change the watering schedule. Water every five to seven days, using the pails to measure when you've reached an inch of watering.
  • Fertilize new sod in spring or fall (whichever comes first) at a ratio of 1 pound of nitrogen per 1,000 square feet. Water the lawn briefly after application.
  • After two months, aerate the established sod with a core aerator to keep soil from becoming too compact and allow oxygen and nutrients to permeate the ground.


Tips & Warnings

  • Always plant sod within 48 hours of purchase.
  • Do not water a new sod lawn every day. Too much water will pool under the sod layer and rot the roots.
Baca "Expert Way to Treat New Sod" Read more...

Choose a Hedge for a Garden


Article from : ehow.com

How to Choose a Hedge for a Garden


Choose a Hedge for a Garden
With the exception of a brick or stone wall, a dense hedge is the best way to make an attractive and almost impenetrable boundary around a garden. Hedges have a few advantages over walls, too. They can be neatly clipped into decorative shapes, or allowed to grow informally. Of course, unlike a wall or fence, they also change with the seasons.Many plants make effective hedging, from a formal yew as a green backdrop, to a colorful barberry feature in its own right. The most time-consuming task is trimming your hedge. This is usually an annual job, though you may need to do it more often to keep formal or fast-growing hedges in shape. Does this Spark an idea?

Instructions


  • Define the hedge's purpose. Apart from marking the boundary of your property, a hedge can also screen passing traffic, pedestrians or neighbors, giving your garden some privacy. It can also create secluded areas, as well as shelter from wind or sun.
  • Decide whether the hedge will be formal or informal. Also decide whether you prefer it to form an evergreen or deciduous barrier.
  • Select yew or boxwood for formal hedging. Yew is the ultimate in elegant, formal hedging, but is relatively expensive and slow-growing. For low, formal hedging, boxwood makes a dense edging.
  • Create an inexpensive informal hedge with cypress. While yew is formal at the other extreme, hedge-leaved Leyland cypress is fast-growing and cheap. If kept trim, it quickly makes a dense, regular hedge. A slower-growing, and more attractive, evergreen hedge can be made with arborvitae, Lawson cypress, or well-clipped green or variegated hollies.
  • Plant a deciduous hedge. Beech is an excellent deciduous hedge that retains its leaves during the winter to provide a good degree of screening. Deciduous forsythia and flowering quince lose their leaves in autumn, but the interest they provide at other times makes them a good choice where an all-year round barrier is not essential.
  • Select colorful berries for a unique informal hedge. Many barberries make good informal hedges, especially Japanese barberry, with its many cultivars, and pyracantha, which has white flowers and colorful berries.
Baca "Choose a Hedge for a Garden" Read more...

Fungi in Your Garden

>> Monday, November 5, 2012


Article from : ezinearticle.com

Fungi in Your Garden by Jo Poultney 

Fungi may not be on the top of a planting list for your garden, but during autumn gardens provide the perfect habitat for some of our most fascinating species of native fungi. Fungi with weird and wonderful shapes and colours seem to appear almost overnight and then disappear just as quickly. At a time when most plants in the garden are not looking their best, fungi can create an interesting focal point, growing in gravel, under trees and even on the trunk of trees. Here are a few of the most interesting you are likely to find in your garden during the autumn months.

A word of caution before we begin - remember, that although most fungi are harmless and many even edible, a few species are extremely toxic and should be handled with caution. Never attempt to eat a fungus unless you are completely certain of its identity.

Perhaps the most evocative of fungi and one that as children we associate with fairy tales, is the Fly Agaric. This fungi has a long white stem topped by a red cap decorated with a distinctive pattern of white spots that fade with age. It is a common fungi that likes to live among birch and conifer trees. Appreciate it for its beauty but best not to touch it as it is highly toxic.

Another common fungi most often found on pieces of dead wood in the garden is the Common Ink Cap. It has a long stem, white flesh and an egg-shaped cap that gradually expands with age. Although not very visually appealing, this fungi is actually edible.

Another fungus that likes to live on dead deciduous wood, particularly oak, sweet chestnut and beech is the Beefsteak fungus. Often called Ox-tongue fungus because of its shape, it is also edible. It is blood red coloured on the upper side which gradually darkens with age, and white on the underside. Another similar fungus you certainly won't miss is the bright yellow Chicken of the Woods. It lives on both living wood and the trunks of dead deciduous trees. It is also edible and actually very tasty.

Less appealing and, not surprisingly, inedible, is the Stinking parasol. This white parasol-shaped fungus has dark brown scales on the top and an unpleasant smell. It is common to woods as well as gardens.
Next time you are out in the garden, take a look around for some of these fascinating fungi. In particularly wet autumns you will even find them growing in garden planters.

Article Source: http://EzineArticles.com/7362291
Baca "Fungi in Your Garden" Read more...

How to Grow Saint Augustine Grass


Article from : ezinearticle.com

Causes Of Thatch In Saint Augustine Grass  By Wade Garrett 

The thatch layer in St Augustine grass is one of its greatest drawbacks. Over the years as this thatch layer continues to increase in thickness, we will begin to find our turf is slowly rising higher and higher above the pathways surrounding our lawns. Its something which all homeowners of this grass type have always complained about, so what are the causes of excessive thatch in St Augustine grass, and what can we do to prevent it?
Saint Augustine grass is prone to this heavy thatching, so if we're going to use this turf type as a home lawn, then we should understand that we're going to have to expect to be dealing with its thatch layer in one way or another over the life of the lawn.
This grass is quite unique amongst the warm season grass types, in that it doesn't have underground runners called rhizomes. Instead, this lawn type only has above ground runners, which are called stolons. It is these thick stolons which grow above the soil level which make up the majority of thatch and the reason for the thatch occurring so dramatically in St Augustine lawns.
Apart from the natural inclination of this lawn type to thatch heavily, we also have one major factor involved in how we look after this grass type, and most importantly where we choose to grow this sod, which will in turn increase of decrease the incidence of excessive thatch in these lawns.
The biggest factor above all others when it comes to causes of thatching, is whether we grow Saint Augustine grass in the sun or the shade. St Augustine is predominantly a shade type grass, which excels at growing in partial shade levels of up to 70%, whereas other grass types such as Bermuda grass would otherwise just drop dead from lack of sun.
These lawn types also do their very best when grown in these partially shaded environments. And when we grow these lawns in these partial shaded conditions, the turf will natural develop far less thatch. In fact, the thatching of St Augustine grass when grown in partial shade is often negligible, and may not even need any treatments to control thatch in these conditions whatsoever.
However, once we begin growing Saint Augustine grass in full sun, it will be in these growing environments that we will see thatching get to its worst levels. Independent studies into St Augustine grass being grown in Australia recently proved that thatching in St Augustine lawns is substantially worse in full sun, than when this grass is grown in its favourite position in the yard, which is in partial shade.
With these important considerations in mind, if we're wanting to grow St Augustine grass as a home lawn, and to enjoy all the wonderful benefits this lawn provides, then we should also pay careful attention to where we intend to plant this lawn type, before it goes into the ground, while thinking to the future maintenance and care of our St Augustine lawns with careful planning and consideration.
Wade Garrett is a turf professional with over 10 years experience in the field of lawn care. With these many years of experience, backed up by training and ongoing research. Wade now shares his knowledge with readers on The Buffalo Lawn Care Site, where all matters of Buffalo lawn care are discussed, such as Controlling Armyworm In Buffalo Grass, and the highly respected Buffalo Grass Review, plus discussions of all other aspects of this specialised field of lawn care.

Article Source: http://EzineArticles.com/7361655
Baca "How to Grow Saint Augustine Grass" Read more...

Expert Dwarf Fruit Trees


Article from : ezinearticle.com

Dwarf Fruit Trees By Deon Ferdinand Minnie 

You are an avid gardener. However, do not have enough space to live out your passion for gardening. Dwarf trees are the solution. The dwarf fruit tree is a smaller tree but will still produce regular sized fruits. Miniature fruit trees are very popular with backyard and balcony gardeners who want a variety of their favorite fruits. Growing your own dwarf fruit trees in your backyard or patio is possible with a bit of effort. Soon a mini orchard will be on the patio.
Dwarf fruit trees are perfect where you only have a limited amount of outdoor space. The dwarf fruit trees can actually be left in potted containers. Soon you will have a large crop of fruit growing right on your patio or apartment balcony. Delicious fruit will be available in your house for seasons to come.
First, decide the ideal spot you want to place the tree. Take in consideration the amount of shade and sunlight it will need.
Choose Fruit Tree Varieties.
You can select from a vast range of trees like apple, peach, cherry. Select your fruit tree based on the amount of sunlight or shade it needs. Apple trees require plenty of sunlight with good air circulation. Space the dwarf fruit trees so it do not get too overcrowded on the patio. Planting is best done in late autumn. Protect the roots and keep them moist until they are planted. Reducing the size of the trees can be done in four ways.
Dwarfing Rootstocks
Branches of fruit trees are grafted to dwarf rootstocks to produce smaller trees. Their are several varieties of dwarfing rootstock available which restrict the tree's growth. For a backyard orchard, you can grow several smaller trees of your favorite fruit,one large tree with a few different varieties grafted onto it. Some dwarfing rootstocks are better suited for dry and poor soil, where other rootstocks will need high quality soil. Miniature or dwarfing rootstock is not the same across all fruit varieties. You can produce 3 to four foot high dwarf apples, but a dwarf cherry tree is still a tree 18 to 20 feet tall.
Your local nursery should be able to tell you what rootstock their dwarf trees are grown on. Specialist nurseries will graft the varieties you want, on suitable rootstocks for your purpose. If you want a apple on a rootstock for a cordon or espalier, ask your fruit nursery if they can supply you with a particular variety and rootstock combination best suited for your soil, and the type of pruning you want to do.
Genetic dwarf fruit trees
Genetic miniature trees are trees, which are very short with heavy branches. They are not regular sized trees made smaller and you may not be able to get your favorite apple or peach variety as a genetic dwarf. These are most often peaches, nectarines, almonds, apricots and apples, small enough to grow in pots. Depending where you live, they may need winter protection.
Controlled pruning
Pruning methods produce fruit trees of a more manageable size. These trees may be on regular rootstock. Espaliers, where the tree are grown flat on a set of wires on a building or between posts, or cordons, where single straight branches are interwoven to create fence patterns are the two most common types of controlled pruning. Many miniature fruit trees can be espaliered or grown as a cordon, which decorate fences, or for growing flat against the protection of a wall.
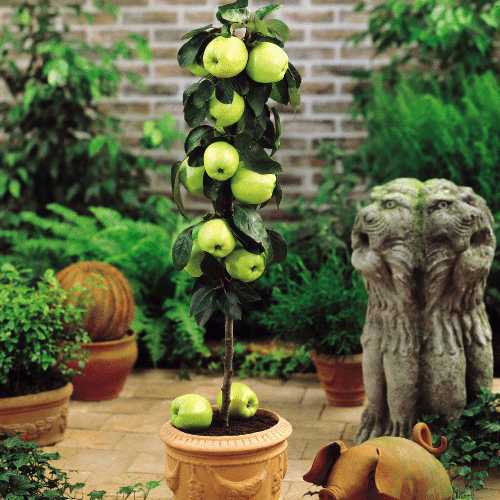
Control Dwarf Tree Growth in Pots.
Fruit trees grown in Pots, with restricted soil and root growth, can be dwarfed in the same way a bonsai tree is dwarfed, with pruning of the roots and branches at the correct time of year. By growing the pot grown varieties on dwarfing rootstocks you can further restrict their size.
Most trees can be grown in large pots (10 to 15 inches),with the exception of cherry trees, which need larger pots, up to 18 inches. Fruit in pots should be grown in fertile soil with 1/3 of the soil mix being perlite or vermiculite to keep the soil from getting waterlogged. You can use slow release fertilizer pellets, or feed them every two weeks with a high potassium liquid feeding. Fruit trees in pots should be repotted every year or two after leaf fall. When your tree has reached its mature size, it should be root pruned every other year and replaced back in it' spot with roughly 20% new soil. Root pruning for this purpose should remove at least the outer inch of roots.

Article Source: http://EzineArticles.com/7343869
Baca "Expert Dwarf Fruit Trees" Read more...

to Know How to Grow Magic Mushrooms

>> Sunday, November 4, 2012


Article from : goarticle.com

Consult the Best Writers to Know How to Grow Magic Mushrooms   by Myrite Markar

People have various hobbies. Many people are passionate about gardening. They like to grow different varieties of plants in their gardens which enhance the beauty of their house. They cultivate vegetables, fruits and flowers. On the other hand there are some persons who have a knack for growing unusual kinds of plants. The mushroom is one such variety which falls under this category. Previously mushrooms were not fit for consuming but ever since the doctors have proved that they contain all the vital nutrients and can cure several diseases, their demand has significantly increased.

Portobello Mushrooms have all the vital elements like phosphorous, potassium, sodium and antioxidants which are extremely essential for the body. It resembles like a brown crimini and usually grows four to six inches in diameter. Always select a fresh mushroom from the shop to avoid any kind of germs. The mushrooms can be preserved for about five to six days. If one cooks them well, it can be stored for several months. They can also be grilled or roasted or eaten as salads.

Mushrooms have helped a great deal in reducing the breast cancer. A thorough research conducted by medical specialists has revealed that chances of developing breast cancer in women are reduced by sixty four percent if they consume mushrooms daily. This is one of the prime reasons as to why people are more interested to know how to grow mushrooms systematically? The mushrooms can be easily cooked. Some mushrooms like White buttons, Portobello and shiitake can be eaten raw. They can be added with meat or consumed with cheese. Nowadays, the chefs are using them in preparation of omelets and also in many Italian dishes such as pastas and pizzas.

It is better to rinse and wash them properly before their usage. But please do not try to soak them in water so as to prevent them from getting water logged. They can be stored in refrigerators to keep it fresh for longer period of time. Even if they lose their freshness, there is nothing to worry about. You can place them on a piece of paper bag which would absorb all the moisture. There are mushroom varieties such as Chinese Black Mushrooms which contain vitamins B2 and B12. Moreover, they are stuffed with rich proteins as well. These are no less than the magic mushrooms. So if want to know how to grow magic mushrooms you can go through several books or even consult the internet.

The inquisitiveness of the people about how to grow mushrooms has been solved by the expert gardeners and mushroom growers. The risotto mushroom has a great flavor and taste. It is the rich source of fats, carbohydrates, iron and calcium. They provide energy and at the same time impart strength to the bones. Start consuming mushrooms on daily basis. They may taste unusual in the beginning but later on can become one of your favorite dishes. After all, there is nothing more important than health. You should compulsorily know how to grow magic mushrooms in bulk.

Baca "to Know How to Grow Magic Mushrooms" Read more...

Harapan Kami

Sitemap

Masukkan Kode Menu Di Sini

  © Blogger templates Semoga Bermanfaat by Ourblogtemplates.com 2011

Back to TOP